Friday 31 August 2012

Swimming Bag Complete!

I have been steadily working on a quilted bag for my mom, using a pattern and fabric that she chose and "asked" me to make for her for Christmas. I learned quite a bit while making the bag, but I'm not eager to make another one!

Here are some pictures of the bag as I worked through the assembly, and some shots of the finished bag:
Chalk line for the pocket (I made one with a pattern and one in a navy solid),


There is a 4 3/4" x 4 3/4" template with the pattern to help "box" the edges.

The bag pinned together, inside out.

Inside view of the inside-out bag. You can see my FMQ here!

In the middle of turning the bag right-side out.

Ta-da! Finished bag.

Very sun-spotty picture of the inside of the bag. It is BIG and DEEP. That white line is where I need to insert cardboard and then sew it up.
I am now trying to find a suitable lining for the bottom of the bag. The pattern recommends stiff cardboard like framing mats but I know that my mom plans to use this bag for swimming stuff (she swims every day with her friends) so I want something stiff and made of plastic. Any ideas?

Lynn (aka Buttons)

Thursday 30 August 2012

Free Motion Quilting (On the Lining to Be Safe!)

Tuesday was my last kid-free sewing day for the summer. I thought I better get down to business and get that fusible fleece on the front and back, lining and pockets for my mother's giant swimming bag. Other than cutting the fleece, everything went pretty smoothly (I hate cutting large, bulky amounts of fabric).

I decided that for the quilting of the outside of the bag, I would use my walking foot and just echo the squares (no need for extra pattern here!). Here is what the back looks like:

The lining of the bag is a navy solid, and I thought this was the perfect opportunity to get some free motion quilting practice. I knew I was going to use a navy thread, and since it is the lining and colour-on-colour my errors would not stand out too much.

Here is the completed first panel of lining:
This picture makes the colour seem much lighter than it is- it is actually a very dark navy. I tried a meandering technique and found that though I wasn't too bad at pace and keeping my stitch length pretty uniform, my actual patterning needs some work. For a better shot, here is the back:
All the pointy parts are where I lost my "flow" and I have certainly discovered that when you have flow the FMQ goes great, and when you don't you get weird patterns. I don't think it is all that bad, but I will definitely hold off quilting an actual quilt where the stitches are supposed to show.

Also, as with my other FMQ experiences, here is what I encountered when my movements were too jerky:
I know that is totally my fault, and I really need to work on it.

The second half of the lining went much better; I had my flow going and was warmed up from the first panel. Part way through, however, I had this problem:
Blast! Out of thread! I was using some navy thread I have had since I started sewing and wanted to use it up, but not before I was finished quilting! I went through my supplies (no way was I making a trip to the store for this) and found a slightly darker navy:
Ran out of 278, switched to 280
I honestly can't tell the difference and it is on the lining so I am not too worried about it. And it means using up more thread so I can stick to 100% cotton thread (I'm loving Mettler but finding it leaves lots of fluff in my machine).

Now both the lining and front/back are fused and quilted. I'm making progress!

Lynn (aka Buttons)

Wednesday 29 August 2012

Giant Swimming Bag Update

My mom purchased a pattern and a stack of fat quarters on her last trip to The Hobby Horse, a quilting store in Georgetown, Ontario. The thing is, my mom doesn't sew. She bought the pattern for me to make her a new swimming bag, cheerfully telling me she could "wait until Christmas."

The pattern is not to my taste (give me an Amy Butler bag pattern any day), nor is it well written (typos, missed steps, unclear diagrams). Also, the fabric my mom picked isn't much to my taste either. This is when, as a quilter, you suck it up and make it anyway. Because you love the person who picked the fabric and pattern, and because you know he or she will love the finished product even if you don't. (Let's just hope she doesn't make a habit of this!) :)

Here is an update of the progress. I pieced the rows, being careful to ensure that the same fabrics won't touch each other when the bag is assembled (there is a vague reference to this in the pattern, but they don't explain how the folding is done or where the fabrics will touch, so who knows if I did it correctly. Even the woman at the store told me when she made it she accidentally had same fabrics touching. It does not bode well for a novice like me).

And here are the pictures to show you the bag in the early stages:


I stopped after this stage for a break to do something I will enjoy more. To be honest, once I assemble the rows together the next stage is fusible fleece which makes me a little nervous. This bag pattern involves two layers of fleece which makes it even worse!

Wish me luck!

Linking up with WIP Wednesdays over at Freshly Pieced!

Lynn (aka Buttons)

Tuesday 28 August 2012

Christmas Gift Exchange Quilt

Christmas is just around the corner. Well, it feels like it for me, anyway, as Christmas is a crazy time at our house and we have so much family to see (and so many presents to buy!). Presents at our house are totally my responsibility (my husband only buys for me- how did he get that deal?). I like to be organized so I plan- and buy- early. I have about 1/4 of my shopping done, but so much more to go!

With thoughts of Christmas racing through my head, I started planning what we might contribute to a Christmas gift exchange we do with all the adults at my mother-in-law's house. There are usually about 12-14 of us (sometimes more) and we all contribute a (non gender-specific) gift worth $50 for a game involving drawing numbers. First person gets first pick, second person can steal the open present or choose to open another one and so on.

I decided that though a quilt is worth more than $50, I want to make one for the exchange. The problem comes from the non gender-specific part of the rules. What guy will want a quilt? I decided to go with it anyway since the only single man in the group is my brother-in-law. If other men end up with it, I think their wives will appreciate the quilt (at least I hope so!).

And so here is the stack of fabrics I chose for this quilt. They are all from my stash, and I think the colours work for both men and women and for multiple generations (we have people in their 80s and people in their 20s in the exchange, and everywhere in between!).


I am also using a solid white for strips between the squares. I plan to use that brown and white fabric (not the Pearl Bracelet in Chocolate, the other one) for borders. And I am making my own design for this quilt. It involves 5" squares of the pattern with 2" sashing between blocks and rows. Fingers crossed it turns out well! Toes crossed that whomever in the family gets it in the exchange will give it love!

Lynn (aka Buttons)

Monday 27 August 2012

Garden Lattice Quilt Top & Backing Finished

Mindful of my soon-to-disappear sewing time (back to work for me!) I have been working on Christmas projects to try to get them done or as close to done as possible to ensure they are ready to go under the tree.

I have been working on a quilt for my mom as a surprise for Christmas using a jelly roll and a pattern involving an Omnigrid 98L. On Thursday I finished the quilt top and, feeling super motivated, pieced the backing as well.

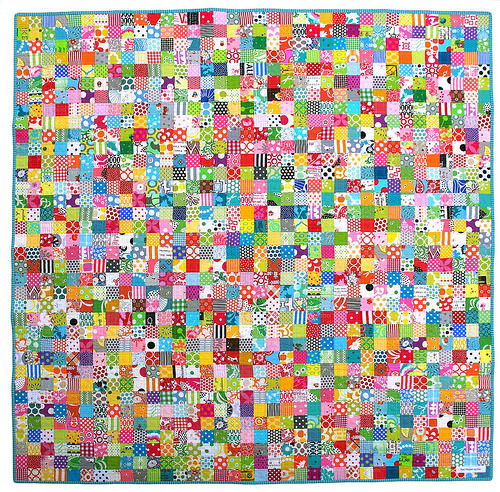
Here is the quilt top:

And here is a close-up of the borders so you get a better sense of the pattern:


I really liked pieced backings on quilts because I think it adds to the "handmade" feel of the quilt in the best possible way. I went through my stash and the remaining bits from making the quilt (I had a strip of border and two blocks to use). I also pulled out my Kona Slate and Kona Artichoke as they both worked well colour-wise. Admittedly I was reluctant to use my whole yard of Kona Artichoke in one go. I absolutely love the colour and was feeling sad that none will end up as squares or as accent fabric in other quilts. Then I told myself to shut up about it and use it, knowing that I can always order more when/if I need it. Plus, it is for my mom. She's worth it.

Here is the backing:

My husband is not a fan of the backing. He hates that it is asymmetrical. He has the same complaint about Baby Bump's Zoo (though he didn't tell me at the time). I, on the other hand, love the asymmetrical, scrappy vibe to the back. I hope my mom likes it!

Now I need to get batting and actually quilt the darn thing. Basting is my least favourite part of quilting, to be sure. If only I had a long arm quilting fairy in my basement, ready to scoop up my backings and quilt tops and quilt them for me. For free, mind you. I'm cheap like that.

Now to get to work piecing mom's swimming bag, a gift for Christmas that she does know about (she bought the pattern and fabric and told me to make it for her!).

Lynn (aka Buttons)

Sunday 26 August 2012

More Fabric Shopping (I Need an Intervention)

This past Tuesday I made my way up to The Hobby Horse because
a) I had a gift certificate and two points cards to spend
b) I needed interfacing for my mom's quilted bag, as well as some solids for the same bag
c) I love fabric shopping.

I used the gift cards as an excuse to also treat myself to a new rotary cutter (mine is a fairly cheap one and I am flying through blades right now) and some Microtex 80/12 needles that I have been looking for in all my shopping trips over the last month.

Here are my purchases:
Two types of interfacing

One solid white and two white-on-whites (I tried to take a close-up but you just can't see the poppy detailing or letter detailing on the fabrics).

A solid navy to balance all those blue patterns on the swimming bag and a black and white polkadot pattern that I am planning to use to bind my rainbow flip quilt.

Ann Kelle's dinosaur fabric! I love this fabric and almost bought some online. When I saw it there today I knew I had to take some home! I was very reserved, buying just 0.5m.

New rotary cutter, blade replacement, needles and thread.
I know, I know, I have a problem. I just can't help myself! Maybe I need to join a support group?

Lynn (aka Buttons)

Saturday 25 August 2012

Mail Delivery: Red Pepper Quilts Blogger Bundle

I am addicted to quilting blogs (so much so that I started my own!) and have a few favourites. If I had to choose just one blog that I could read every day it would have to be Red Pepper Quilts. The blog is written by Rita, a self-taught sewer who lives in Melbourne, Australia. Her quilts are modern, fresh and gorgeous (and always sold from her etsy store in about five minutes!).

Here are some samples of her incredible work (all photos are courtesy of Red Pepper Quilts):


You can see how amazing her work is; how bright and vibrant her colours and fabrics are, how beautiful her quilting is. I give you this information because when I saw that Pink Castle Fabrics had a Rita of Red Pepper Quilts blogger bundle, I almost squealed with delight. I hemmed and hawed about buying it until I came across a 20% discount code. I knew I had to have this bundle!

Here is what it looks like:
When I went back to get the picture of the bundle for this post I discovered it is already sold out. Phew! Glad I bought it when I did!

And here is my bundle in real life:


It just feels so...RPQ. I need to think of something special to make with this. There is no way I'm using this for anyone but me! That makes two me-only quilts I need to make: one with Salt Air by Cosmo Cricket (I have a jelly roll and pattern in mind) and one with this bundle that makes me so happy. I'm a quilting groupie!

Lynn (aka Buttons)

Friday 24 August 2012

Pineapple Block Tutorial from One Shabby Chick

On Pinterest I have a board with hundreds of sewing and quilting pins. One of the first things I pinned to this board is a tutorial for a Pineapple Block from One Shabby Chick.

This is her finished block:

Photo courtesy of One Shabby Chick
The block appeals to be because of the fabric choices but also because the tutorial seems to produce beautiful seemingly difficult blocks with relatively little complication (aka no cutting triangles!).

I selected some Riley Blake fabric from my stash and got to work:
The initial slicing was not as straight as I would have liked. I will need to practice that.

Results after first cut.

Selected a piece for the outer edge.


And the results of my experiment:

After slicing it to make the edges even (I went to a 10" square slice) some of my inner triangles got their tips sliced off. I think my very hasty measurements (since I was just experimenting, after all) were the cause of this problem. I think the block is pretty neat but not quite as easy as it seems.

My mind is working hard thinking of all the ways I could use this block. Maybe for the upcoming baby in my group of friends?

Lynn (aka Buttons)

Thursday 23 August 2012

HST QAL: August Block and Blocks-to-Date

I have been participating in my first quilt along following Jeni and her HST blocks over at In Color Order.
I only came across the QAL a few weeks ago and have been happily learning and catching up. Sunday I got to work on my final block which will have me up-to-date, my August block.

I picked my fabrics (all from Outfoxed by Lizzy House) and got to work.
Here is what Jeni's block looks like:
And here is what my finished August block looks like:

Also, since I am now caught up, I thought I would lay out all the blocks to see them together.
I am finding that I am really noticing the pale pink square in the pinwheel block, and I have to remember to use that fabric in my September block so it is not alone in this quilt. It is a pretty vibrant, fun quilt, and I think my daughter will love it. I also think there are several blocks I would definitely make again. This HST QAL has been fun!

Lynn (aka Buttons)

Wednesday 22 August 2012

HST QAL: July Block

After making significant progress on my mom's Garden Lattice quilt, I dove back into the two remaining HST QAL blocks (and then I'm caught up!). The quilt along is with Jeni from In Color Order.

This is what the layout of the HSTs for the July block looks like:

I prepared my HSTs:

And then I decided to audition some possible combinations for the block. Check out my choices:
Option A

Option B

Option C

Option D
You can see how this one block layout has so many interesting variations depending on the value of the fabric. I thought for sure that Option A was for me, but then reconsidered for awhile before actually sewing anything together. Option C was sort of speaking to me, and I think Option D is quite appealing because of the graphic punch of the dark purple in the centre. I decided to walk away and come back to it a few hours later.

Here is the finished block from In Color Order:
And here is my finished block:

Do you think I made the right choice?

Lynn (aka Buttons)